Showing posts with label kitchen. Show all posts

Monday, October 06, 2008

Kitchen Remodel, phases 2 and 3

I'll expand on this later, but here's the kitchen at the almost-end of phase 3. Left to do in phase 3: installing baseboards and the pieces that go at the end of the countertops. Raising the feet at the back of the range so that it's level and even with the countertops.

The kitchen used to be an L-shape. Nothing on the left existed (although these photos barely show the left), and the refrigerator was in the left corner as this photo is oriented. Because the old, battered cabinets had a missing drawer (long story), I suffered through having only 2 drawers for about 15 years. Now I have 8.

Phase 4: replacement of upper cabinets, starting with the one above the range, and all cabinets to the right of it. (If the old and new cabinets look a lot alike, it's because I've used the same paint color on both of them.) Knobs for the cabinets (they'll match the faucet). New light fixture over the sink. Probably nothing fancy or even visible except by those standing at the sink and looking up. Combination microwave/exhaust fan over the range. This might be finished by year's end.

The color scheme was inspired by the Mexican plate that hangs over the range.

A big shout-out to Tall Son, who has done most of the work, but not without my help -- and interference. As I tell him, he has skills, but I have opinions.


For fun, here's Phase 2, the other side of the tiny room (mine is a tiny house):


The flooring on the right has since been completed.

This post shows the kitchen in the midst of phase 1. At the time, I had no idea how many phases it would take.

Wednesday, October 11, 2006

Kitchen mini-remodel, episode 2: How to remove wallpaper and how not to

A few weeks ago I removed most of the wallpaper from the eating side of the kitchen. Although I used a Paper Tiger and water, I wasn't having a lot of luck getting all the paper and glue off, and in some places the paint is coming completely off, revealing the paper of the drywall. I didn't use a chemical stripper with the Paper Tiger because I had pulled some of the paper off previously with good results, and frankly I didn't want to spend the money.

Right after that, I was watching Designed to Sell on my beloved HGTV, and Monica Pederson had a family removing wallpaper. She mentioned that if you mix liquid fabric softener with the water, it helps loosen the glue. (In this particular case, she had the family pull off the top part of the paper first, and then she had them spray the "underpaper.") This sounded really familiar...like something I had heard before and forgotten.

So today I was back at work on the mini-remodel. I perforated that paper so that not a single inch went unperforated, then sprayed the whole thing with the water and softener mix. (I estimate I put an ounce or two of softener into a quart of water.) I made no attempt to pull off the top layer first--I don't see the point. I saturated the wall, then saturated some more. I was going to wait about a half hour because that time frame seemed to work well in the past, but curiosity grabbed me by the arm and led me to the kitchen to start prying off the paper about 20 minutes in. It sort of came off ok, but the paper was partly wet and partly dry, so I sprayed it one more time and waited another five minutes.

At that point I was able to pull the paper off in sheets...I didn't even have to stand on the stool to get to the top. I just grabbed the bottom part and peeled it off upwards. It was, I'm not kidding, as easy to get off as pulling tissues out of a tissue box. All work should be so hard! It also does seem that there's very little glue residue left on the wall.

Yippee!

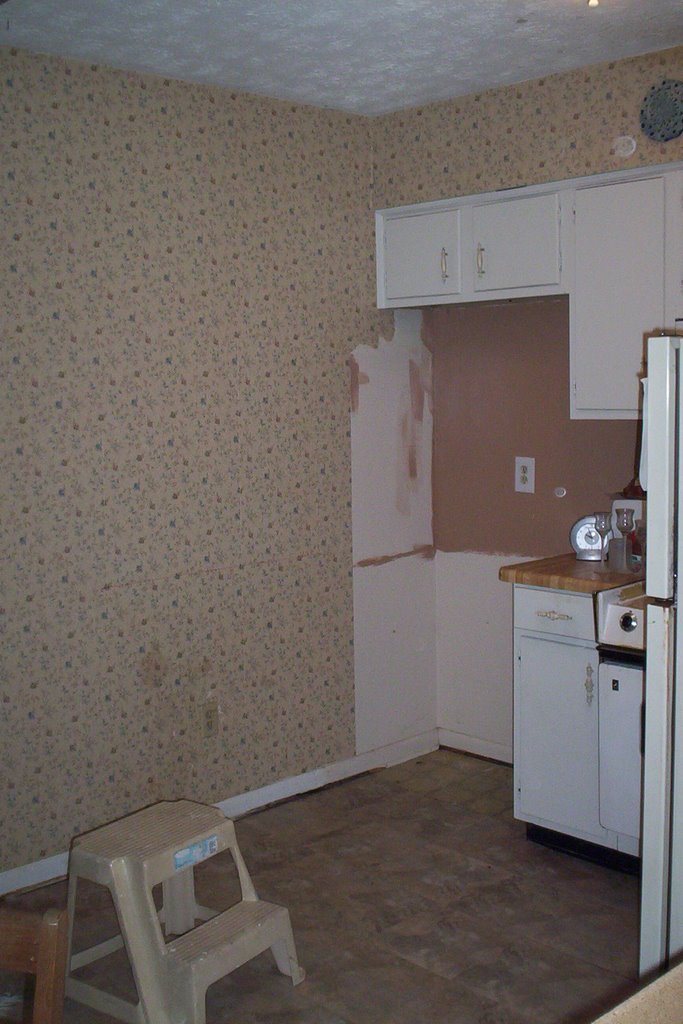
Kitchen wall before:


Kitchen wall right now:

(Well, I can't show it to you right now. I've uploaded the picture twice, Blogger says the upload was successful, but then it's not here. I'll try to do it again later.)

Obviously the refrigerator was in the corner beneath the cabinet. I'm trying to get Tall Son to build a microwave shelf under that cabinet. The refrig is moving to the area in the left part of this picture, and I'm installing cabinets in the space between. (This is why I didn't remove all the wallpaper, but as easy as it was, I could have.)

One concern I have is that in a few more places the paint is coming off clean, as a single piece of latex. I could almost peel the wall clean to the drywall if I had that kind of time and patience. I'm not sure how to deal with this...I think I'll try to sand the edges of these "peels," then prime. If that doesn't work...?

Later today Tall Son and I go to pick up the new Whirpool RANGE. Whoopee!

Saturday, October 07, 2006

Tell me I did the right thing!!! Kitchen mini-remodel, part one

I bought this tonight at Lowe's:


Whirlpool RF262LXSQ. Smooth cooktop; self-cleaning oven; drawer (big deal to someone who's had a drop-in for 30 years...)

I wanted a GE because the outgoing stove (May I please call it a stove now? Everyone I know calls these things STOVES, but people who make them and sell them call them RANGES. Now that I'm finished shopping, may I please use my own terminology?) is 30 years old and still works. But oh, how ugly it is! Home Depot isn't having a sale, I'm po'd at Sears, so Lowe's was my target store. However, all Lowe's had in stock in my price and feature range that was GE cost $600. But I could get the Whirlpool for $500. So I did. Did I do the right thing???

The kitchen is undergoing a mini-remodel. I wanted to rip everything out and create one of those magazine beauties. But I had to get real...I'll need a new car soon. I can probably limp along another year or two in the hand-me-down truck I drive, but as I look ahead I see that taking out a loan for a car is more important than taking out a loan for a dream kitchen. Especially since I avoid cooking...

More later.